Observation Report 4/3/2011

Another less-than-brilliant night, seeing-wise. Clear skies, but poor transparency. This was my first time out with the 127 Mak which I’d temporarily bodged onto an EQ1 mount though, so I wasn’t going to miss the opportunity even though I did end up hunting Messier objects with it when my ST102 would probably have been more suited.

Starting in the west, M32 and M110 proved impossible to separate from M31, probably due to a combination of the wrong scope, poor seeing and being low on the horizon. I abandoned M33, M39 and M74 for the same reason. After a such a sorry start I eventually managed to find M103, but it did take quite some hunting down and wasn’t visible as much more than a few points of light, if that. One to try with the refractor another time.

Having had such poor luck with the western sky I moved over to Canes Venatici and identified M3, M63 and M94, but utterly failed to pick out M106 when I’m sure I must have had the scope pointing straight at it more than once.

I also failed with my first target in Coma Berenices — M88, but located M53 with some difficulty and then M85.

Hercules hasn’t really been far enough above the horizon to view until now, but tonight my first sight of M13 was stunning, as was M92. Definitely ones to revisit with a refractor when they’re higher in the sky.

Finally for this evening I spent a short while viewing Saturn, but it was really still too low and the seeing in its direction (which is unfortunately towards the light dome of Taunton from my usual observation position) was too poor to make it worth spending a lot of time on.

Overall I was very pleased with the Mak, despite it being far too heavy for the mount and using it for viewing objects it’s not particularly well-suited for. I look forward to getting it onto an EQ3-2 mount and spending some more time looking at the moon and Saturn.

Posted in Astronomy | Tagged , | Leave a comment

View of ISS and Discovery on its way home

I was looking at some galaxy information in Stellarium last night with my son when I noticed the ISS pop up over the horizon. I’ve never seen it before, so we rushed outside to watch it pass overhead and were treated to far more. Discovery had just undocked from the ISS and started its journey home and we were treated to a view of the shuttle leading the ISS by a few seconds across the entire sky. Fantastic to see, and all the more poignant because it is planned to be the last trip Discovery will make.

Shame I didn’t have a suitable camera and scope set up, but we were lucky to notice it happening in the first place.

Posted in Astronomy | Tagged | Leave a comment

Spawny Frogs

Once upon a many years ago, a cart track ran from a nearby road and turned at our yard to run down to the local corn mill. The track has long since fallen out of use, but a dip in the track next to the yard has slowly collected water and now contains a large population of frogs. Sadly it’s heavily shaded by sycamore weedstrees that shed their leaves into the pond each autumn. At some point I intend to get rid of the sycamore except where it shades the pond from direct sun and rake a lot of the leaves out to try to keep the water healthier.

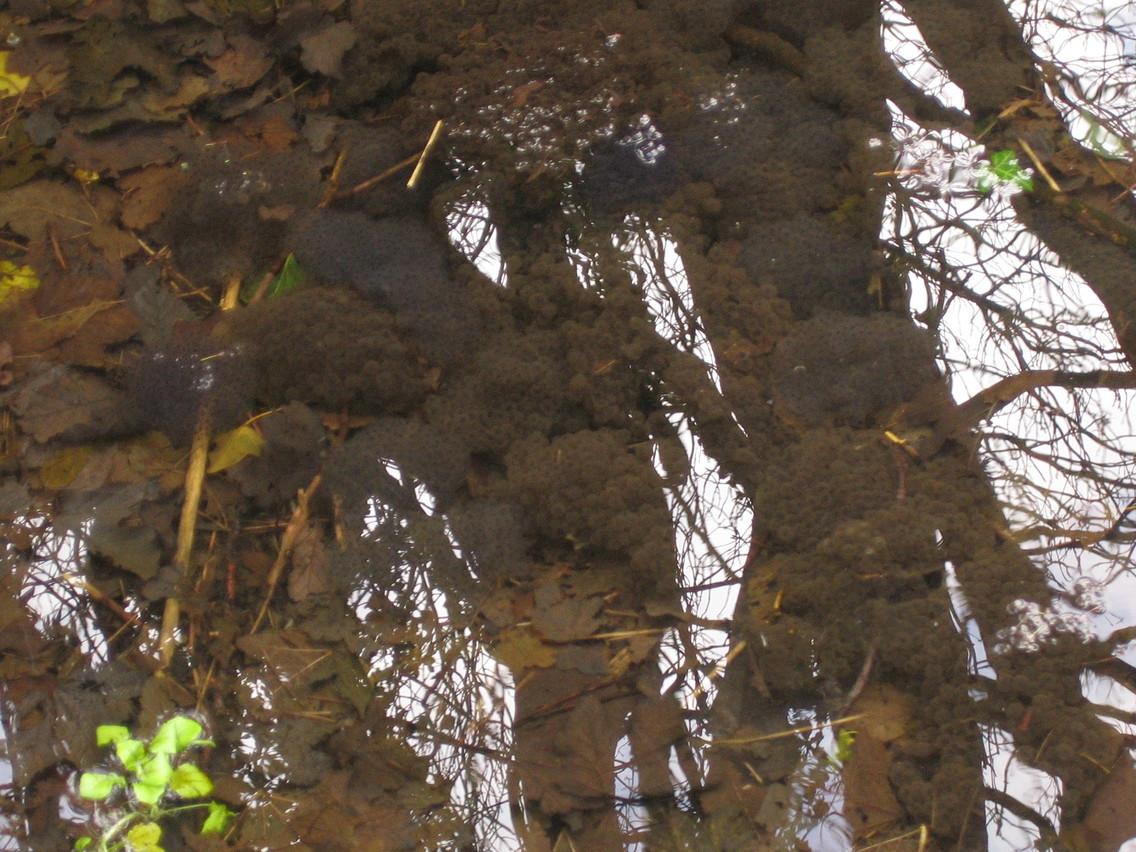
A couple of weeks ago whilst chainsawing logs near the pond I stopped to rest and initially thought I heard a distant tractor engine, but eventually realised that what I was hearing was lots of frogs croaking. A quick visit to the pond revealed perhaps around fifty frogs with their heads poking through the surface of the water, croaking away. A couple of days ago I went back to see if they were still there. They weren’t, but this not particularly great image shows what I did find:

I don’t know why it seems to be two different colours. Perhaps two different breeds of frog, or different ages of spawn, or perhaps one isn’t even frogs. Maybe one day I’ll find out. I’ll try to remember to go back regularly to see how they’re getting on.

Posted in Environment, Smallholding | Tagged , , , | Leave a comment

Cider Press Construction (Part 1)

For pressing my cider apples I decided I couldn’t justify the price of even the smaller commercially-produced presses and after a fair bit of research I felt I could build one myself that should do an acceptable job. As it worked out, the first one I built worked ok, but really wasn’t strong enough to withstand the twelve tonne bottle jack I’m using to drive the press, so I’ve rebuilt another to the same plans but with heavier-duty components.

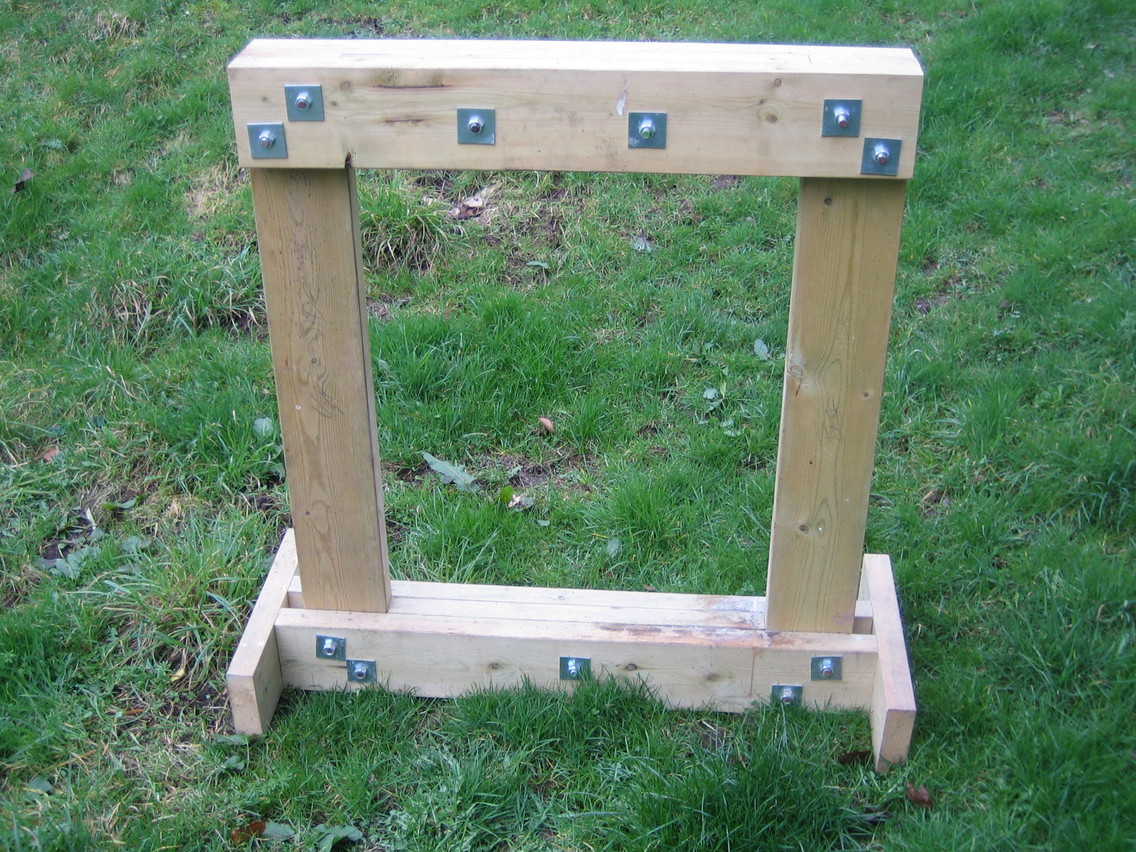
The first job was to build the frame. It’s constructed from 6″x2″ planed square edge timber glued together and secured with 12mm threaded steel rod and large square washers:

The cutting list is:

  • 2 x 100cm for the outer base sections
  • 2 x 92cm for the outer top sections
  • 2 x 64cm, one for the centre base and top sections
  • 2 x 109cm for the uprights
  • 2 x 40cm for the “feet”

I started by laying out an outer base and top section and gluing the base and top centers and uprights to them to form a rectangle, holding all the parts together with clamps whilst I fixed the remaining top and bottom outer sections and again clamped them in position. I could then drill out all the holes for the threaded rods which I cut to length and bolted up. I chose to put two rods through each of the corner joints, one through the centre of the base (where the pressing load will be well spread out by the press tray) and two to strengthen the top beam (where the load from the top of the bottle jack is distributed over a much smaller area). That done I left everything to dry.

The final step for the frame was to attach the “feet” to the protruding ends of the base which I did with eight 4″ #10 screws.

Because of the large timber sizes and the additional metalwork, the press frame is heavy. I’d guess around 25kg to 30kg. I’d say it’s about the minimum for pressing apples in the kind of volumes I’m after though.

Next, the press tray.

Posted in Cider-making, Smallholding | Tagged | Leave a comment

Observation Report 2/3/2011

Another night when the seeing was far from great, not helped by having a breakdown truck parked nearby with all the lights flashing whilst I was setting up, and then someone wandering through the adjoining field at about 10pm flashing a very bright torch around, all set off by the sheep on the nearby cricket pitch setting off all the security lights on the pavilion! I had new toys again though, in the guise of a set of Revelation (allegedly the same as GSO) eyepieces, that I wanted to try out.

However, having decided that some of my targets from last time weren’t going to be worth spending time on, I perhaps unwisely picked M76 for my first target. Had I looked at Stellarium and realised that I was going after a tiny planetary nebula with an apparent magnitude of 12, perhaps I’d have looked for something else. Nonetheless I spent a long time hunting from star to star, switching up and down eyepieces to get different magnifications, until I found what I had no other choice than to identify as the nebula in question, though I wasn’t able to identify any detail. It and HIP8053 complete what appears to me as a “pawprint” asterism with φ-Perseii, 2 Perseii, HIP8771 and HIP8598.

Thinking I’d try something a little easier I opted to give M103 a try, but completely failed to locate it for no reason that I could understand, so moving up the magnitudes a little more I moved on to M52 which I located as being near the crossing points of lines drawn between Shedir and Caph in Cassiopeia and β-Cephi and ι-Cephi. Finding the cluster needed 25x magnification and once found opened up to give a good view at around 50x.

After this success I found M31 again thinking that I might look for M32 or M110, but I really couldn’t make enough detail out to say that I could see them. By this time the cloud cover had increased to the point where very little sky was visible so I decided to call it a night, taking my Messier total up to twenty-four.

And the EPs? I’m very pleased with them. The 32mm makes a great EP for scanning the sky and the views through them all are clean and sharp. A proper try out really needs somewhat better seeing than was on offer on this particular night though.

Posted in Astronomy | Tagged , | Leave a comment

Observation Report 26/2/2011

Despite not being a great night in terms of seeing, this was the first time I’d been able to give the ST102 a good try out so I wasn’t going to miss the opportunity.

Initially I skipped a few Messier targets in Andromeda and Cassiopeia because the sky wasn’t sufficiently clear, but eventually managed to locate M34 in Perseus. The wind was rising and began to make viewing tricky from my usual site in the field in front of the house, so I decided to leave things for a while to see if they’d improve.

An hour or so later there was still a strong breeze, so I moved into the lee of the house where the view of the sky is far more restricted. By this time my original targets had set or moved sufficiently far to be obstructed by trees, so I moved around to targets to the east and north-east. First up was M65 which I’d tried unsuccessfully to find with the ST80. This time I found it surprisingly easily, getting both M65 and M66 into the same frame in a V shaped group, two elliptical fuzzy patches.

Pleased by finding these two I scanned the sky between Virgo, Leo and Coma Berenices for other Messier objects, but failed to find any after fifteen minutes or so search, so took a break and attempted M64, the Black Eye Galaxy instead, which proved to be far less elusive. I’ve not yet worked out why this is so-named, and the view didn’t really enlighten me.

It was getting towards 1am by now and the temperature was dropping, so I made one final attempt to locate another failure in the ST80 — M51, the Whirlpool Galaxy. After some hunting around off Alkaid this time I found it, though sadly it wasn’t clear enough to see more than a fuzzy egg-shaped blob.

Not unexpectedly I guess, the ST102 is just like a “big brother” to the ST80, but I’m very pleased that I’ve been able to find objects with it that I struggled to see with the 80mm version.

Posted in Astronomy | Tagged , | Leave a comment

DIY Small-Scale Anaerobic Digestion (part one)

Fans of the 1970’s BBC comedy series “The Good Life” will remember that Tom and Barbara had an electricity generator in the cellar that was powered using pig manure. What may be surprising is that it’s based on a fundamentally sound idea. Under the right conditions organic matter can be broken down by bacteria-like organisms (“composted”, if you will) to produce a mixture of carbon dioxide, hydrogen sulphide and methane. The CO2 and H2S isn’t too hard to extract, leaving methane which can be burned for cooking, heating, or in a generator. Small-scale digesters that do this aren’t at all uncommon in India and Africa where there are suitable “raw materials” and are often little more than one steel drum inverted inside another filled with the waste.

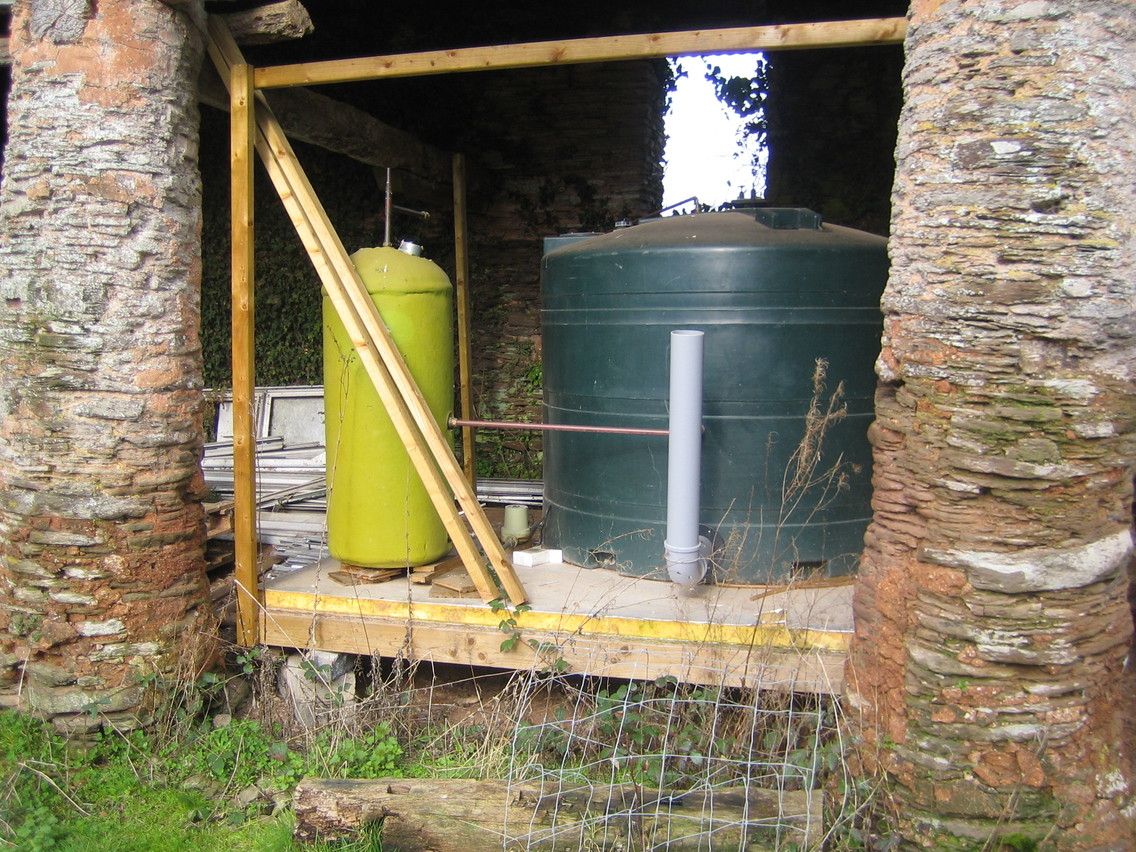
I’ve thought it would be fun for a while to try to build an AD unit myself and feed it chicken manure, kitchen waste and whatever else I could get my hands on for free. A friend gave me his old 2,500 litre oil tank (thanks Mark) and in fits and starts I’m making progress.

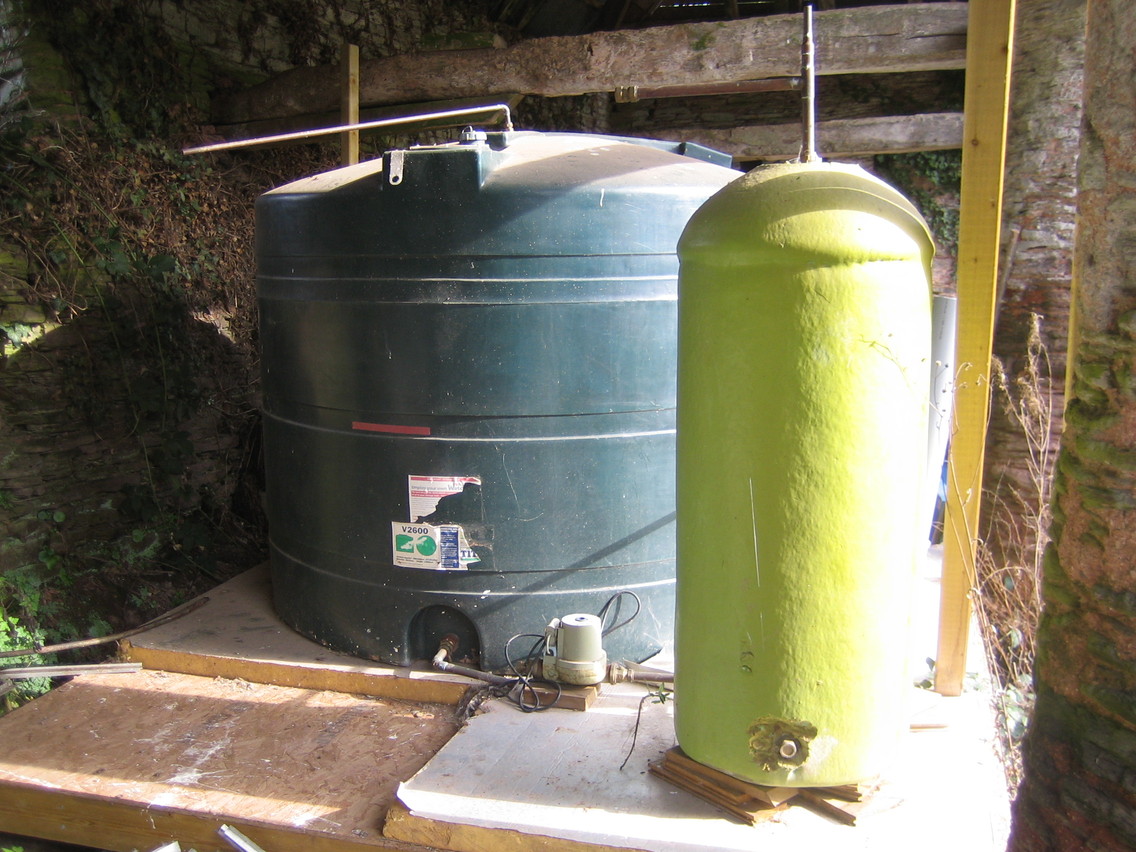
The first thing to do was to provide a large-bore pipe through which the tank could be filled and emptied. I decided to use 100mm soil pipe for this and fitted it into the tank using some flanges intended for large aquarium installations. I’ll seal them in place with silicon sealant.

The next problem is that ideally the contents of the tank needs stirring on a regular basis, but without letting all of the gas escape. As some form of heating is required to get the methane-producing beasties to work, I decided to use the pump circuit to swirl the contents of the tank around. I fitted a pipe from the original tap fitting into an old central heating pump and connected that to the bottom of the coil in a disused copper hot water cylinder. The top of the coil then goes into a second pipe that feeds back into the tank half-way up side, but where the bulkhead fitting goes back into the tank I’ve fitted a bend inside so the flow is back into the tank around the circumference. Hopefully that will start a stirring motion inside. The idea is that the hot water cylinder will be filled with hot water, initially heated by an immersion element, but subsequently perhaps by coolant from a generator and act as a large reservoir of heat to warm the contents of the tank, rather like a domestic heat store hot water system.

The filler cap has also been replaced with a clear perspex sheet allowing me to see inside (and which will seal tight to the top of the tank) and I’ve stood everything on a wooden platform on top of a couple of sheets of 50mm thick insulating material.

This is as far as I’ve reached so far. The next stage is probably to seal everything up and see if it can produce any gas at all, but before I do that I’ll built a cover of polythene sheeting to trap air around everything to try to retain some more heat. I’ll probably also lag the tank with a few layers of loft insulation, or perhaps even bubble-wrap.

Here’s what it looks like so far:

Posted in Environment, Projects, Smallholding | Tagged , , , | 2 Comments

Solar wax melter

Solar wax melters are available commercially and there are a fair few designs about on the web. Here’s one I made a couple of years ago.

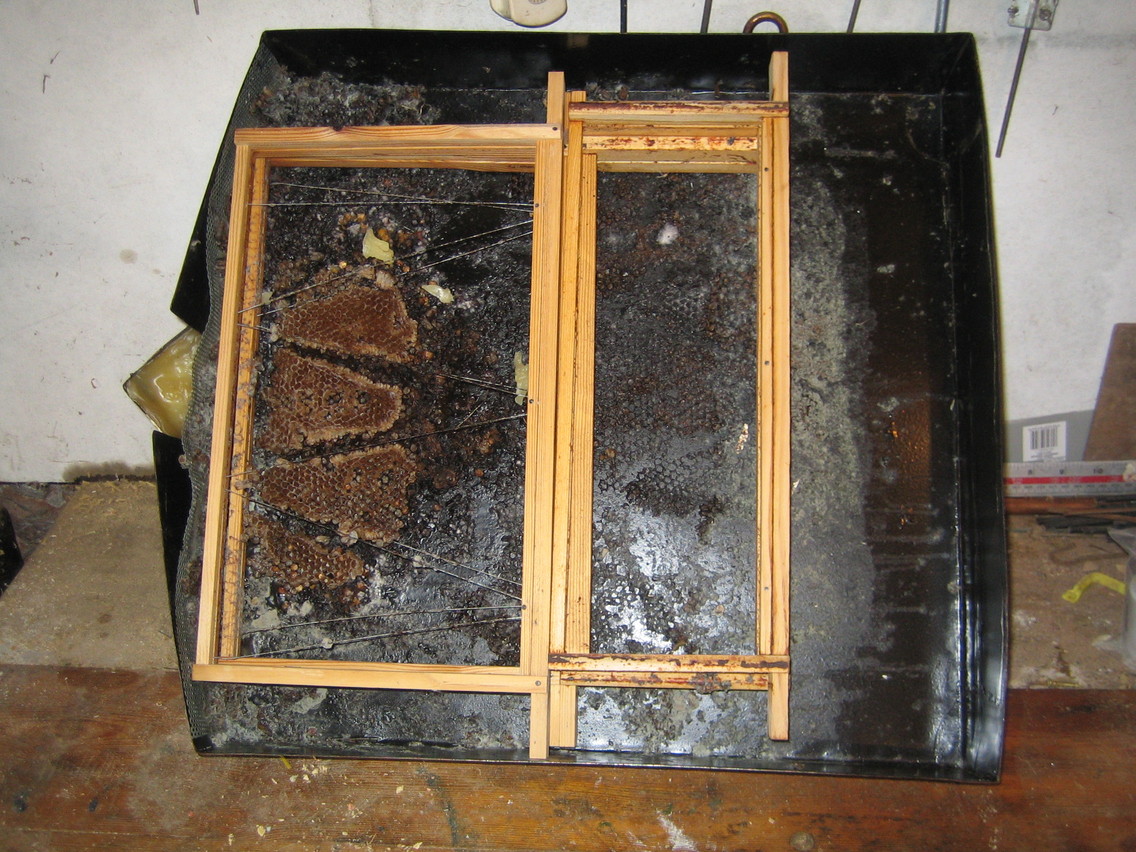
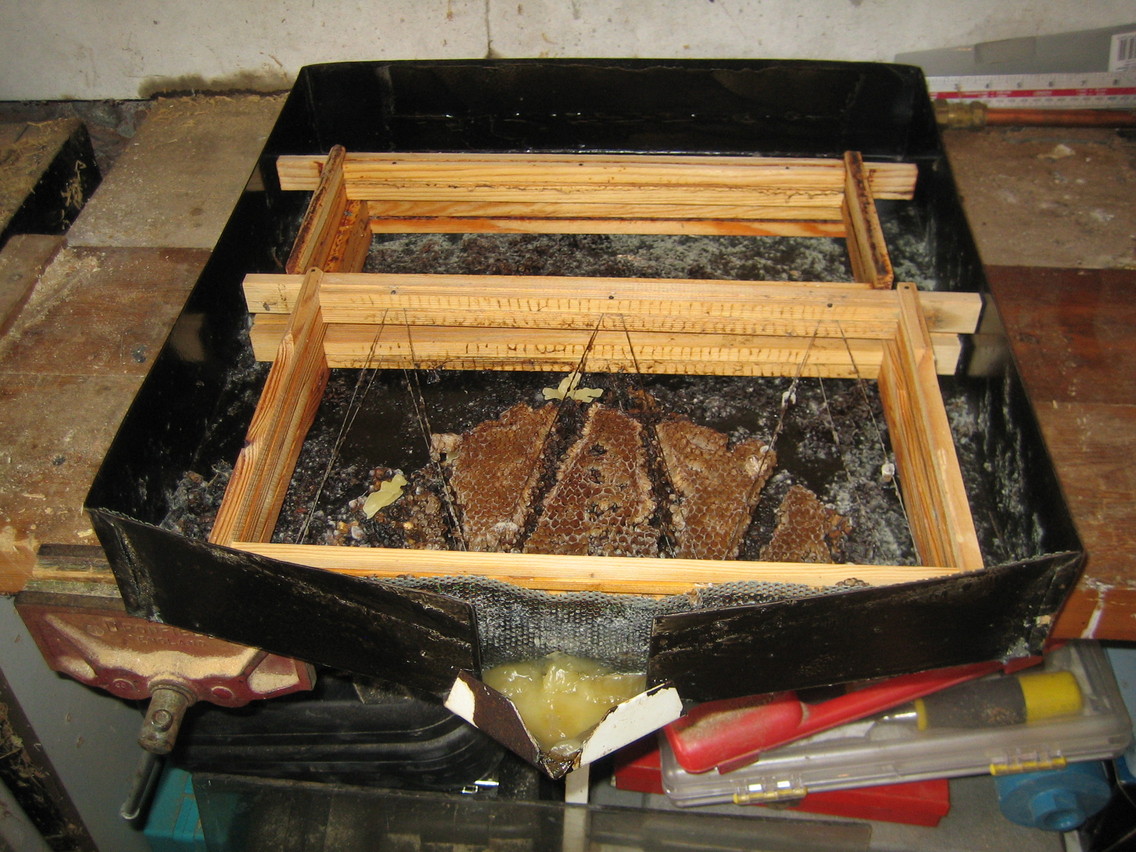
I started with the tray that the frames would sit in. I had some steel sheet lying around that I’d removed from our oil boiler before it went to the tip, thinking it would come in handy one day, so I cleaned that up and drew out a “net” for a tray 18″ wide, 18.5″ long at the sides down to 20.5″ in the middle and with 3″ high sides. This was actually the largest I could make it given the sheet I had available, but actually worked out fairly well as I was planning to make something I could stack four National brood frames or six Nation super frames in. I made tabs on the edges that were to be joined and was intening to pop-rivet them once the sheet was folded up, but in the end they were welded instead. Out of an off-cut of the sheet I folded up a spout and riveted that to the base of the tray, then sprayed the entire tray with flat black Hammerite paint and placed some mesh against the walls above the spout to filter out the worst of the rubbish. This is the finished tray:

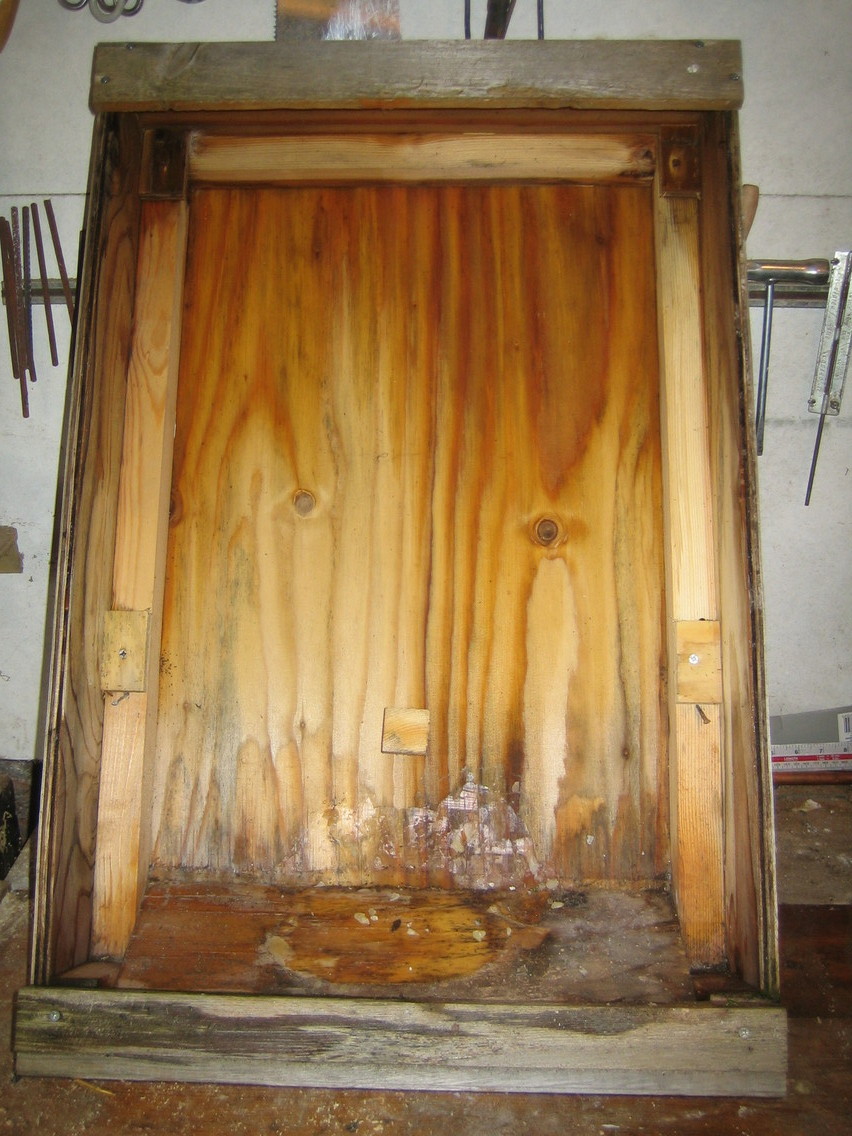
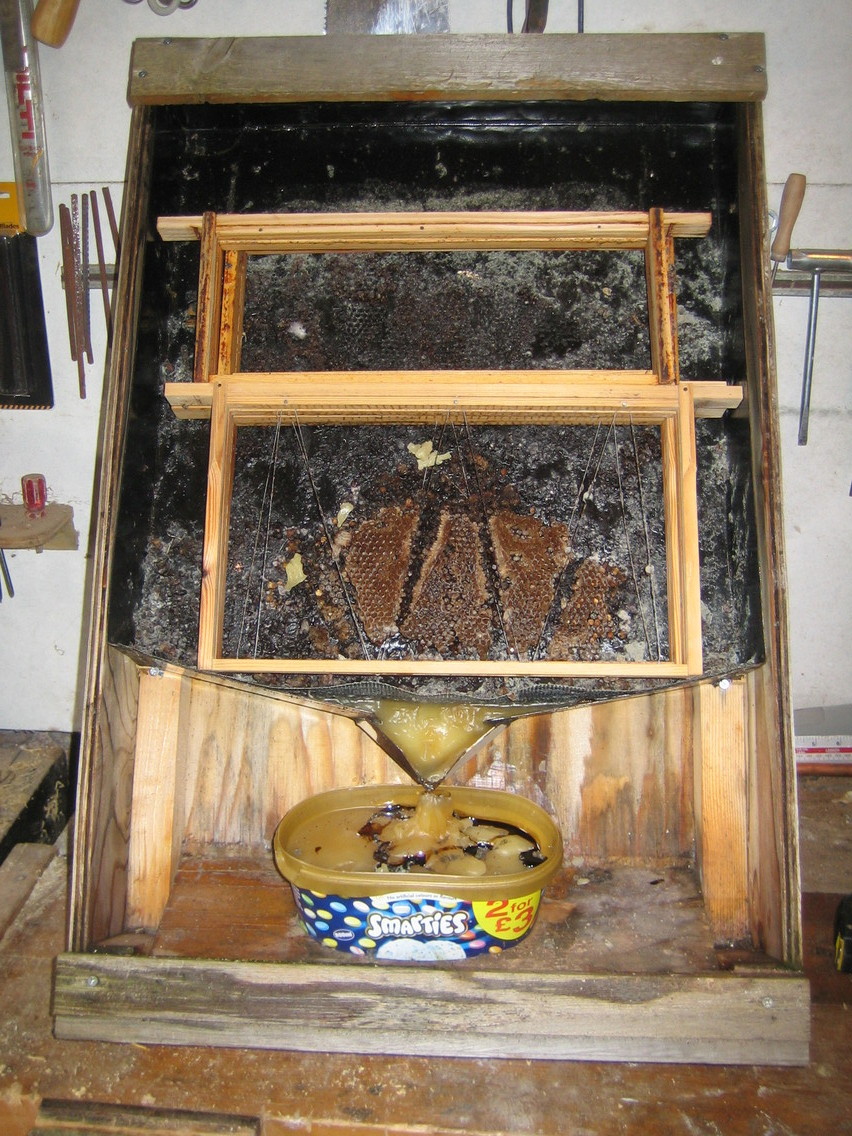
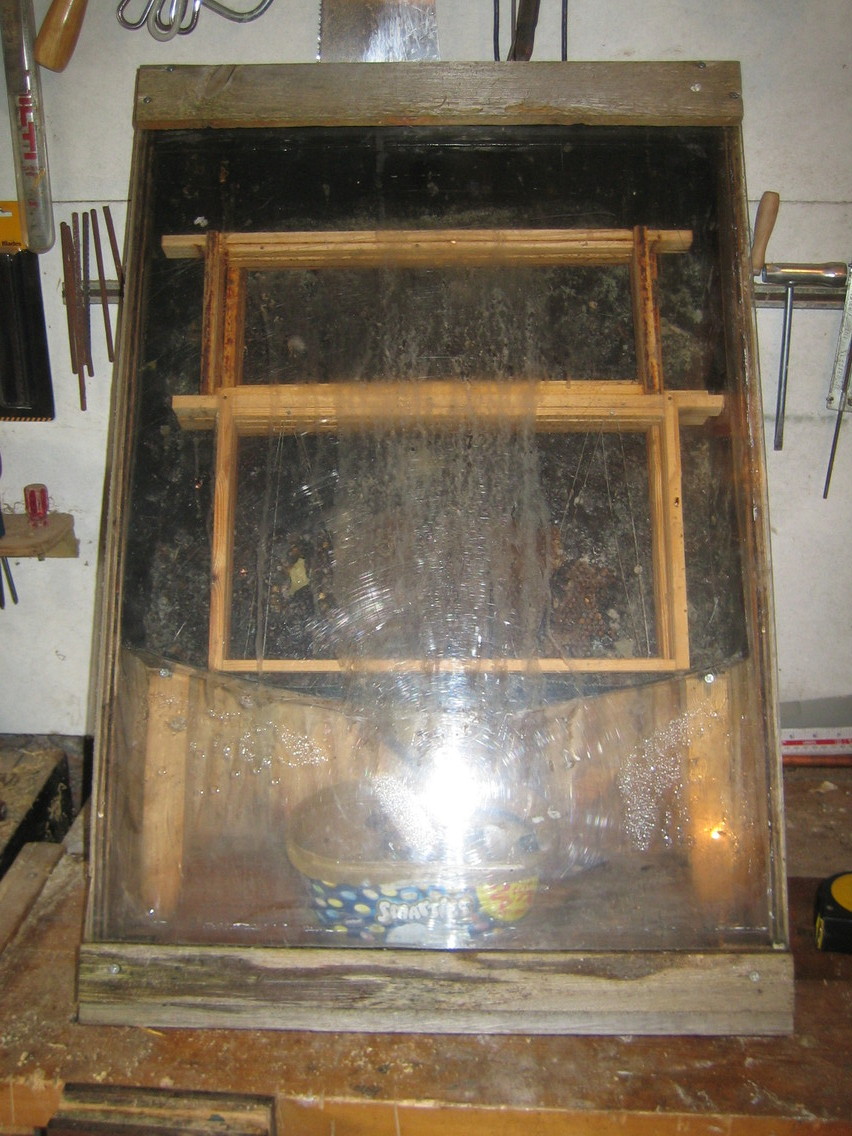
To house the tray I built an open-top wooden box from 12mm marine ply with internal dimensions 18.5″ wide, 29.5″ deep and 5.5″ high. At 45° at one end I added a shelf for the wax collector to stand on. I found the tray wasn’t quite high enough for the spout to reach over the collector, so added a few scraps of ply to the frame to push the tray further up, and a couple of screws hold the tray in place at the top of the box when it’s tilted up. I would liked to have used glass for the top of the box, but with two children running about the place it made more sense to use a scrap of acrylic sheet. To hold the sheet in place at the top I used a length of timber into which I’d cut a rebate with a router, and another length without a rebate at the bottom:

First tests showed the air temperature at the top of the box to reach 90C on a warm summer day and the melter has worked excellently for a couple of years. It does need a little tidying up now. A coat of preservative would probably be sensible as well as a retaining strap to hold the perspex tight to the walls of the box, as small gaps mean bees get interested in getting inside and die very quickly if they do.

The other major change I intend is to make a metal or plastic “lip” to go under the bottom edge of the perspex so rain will be carried off to the sides. I didn’t think this would initially be a problem because I was intending to use it where there’s an overhang that prevents rain reaching it, but that’s near the front door and the box does tend to attract bees which distresses visitors, so it now sits out in the elements.

Generally though I’m very pleased with it, especially given that it cost me nothing but time and a few scraps of material that I had lying around.

Posted in Bee-keeping, Projects | Tagged , | Leave a comment

Creating a bespoke landscape for Stellarium

I use Stellarium on several PCs and laptops to help me plan what I’m going to attempt to observe and for finding objects in the sky when I can’t find them from other pictures or star maps. It’s a great program and I heartily recommend it. It allows the user to select a number of landscapes to render the stars against and, if you can work out how, it also lets you create your own. I found a few sets of instructions on how to do so using Windows, but I’m a UNIX/Linux person so needed a way that would work for me (though as I’m just using hugin and the gimp, this may well work on Windows, too). Here’s what I did.

First take a sequence of shots with a camera from the viewpoint you’ll be using to create a panorama. Ideally choose a day on which the sky is a uniform colour because we’ll want to get rid of it later. If the sky is the same colour as anything else in the image then things will get a bit more awkward later. You need a full 360° with plenty of overlap in each shot — a third is good. I started with north at one edge of the first photograph, because I know exactly which direction that is, but it’s not a major problem wherever you start. Try to keep the horizon in roughly the same place in each photo; it probably helps with lining things up later to keep it in the middle of the shot. You don’t need a particularly good camera. I used an Ixus 40 in manual mode so I could force the same exposure settings for each photograph, although I suspect that it may help to leave auto white balance on. I also took the images in a portrait orientation rather than landscape because I wanted as much of the ground in the shot as possible. My pictures were taken without a tripod or other rest. I suspect it may help to use one, but quite a few things can be fixed later on. I usually have my scope in a field, so I took an extra shot of the grass to use to fill in any missing ground, but if you’re in a garden or on a patio, a few shots from around your feet might be useful just to fill in any gaps later on. This gave me 17 panorama shots of around 2200×1700 pixels to work with. We’ll need them smaller later on, but for the moment transfer them to the PC and keep them in the original format and resolution because the software will be pulling useful information out of them.

The next stage was to stitch all of the photographs together into a panorama. For this I used the “hugin” panorama creator which is available as a package for Ubuntu (my current desktop OS of choice). I loaded the panorama images in from the “Assistant” tab and then skipped straight to the “Control Points” tab which is where you run through the photographs creating control points (no surprises there) that allow hugin to join all the photographs together. If you’re not that familiar with hugin that’s no problem. Neither am I. And despite that it even managed to get the images the correct way up. Select the first image from the drop-down on the left and the second image from the one on the right and pick out a few points (I try to get five as far apart as possible) that appear in both images. Make sure the “auto fine tune” and “auto estimate” options are selected at the bottom right of the window. Click on the first in one image and adjust the position of the cross to get it on an exact spot you can identify, then click on the second image and move the cross to exactly the same place. If you get the cross in roughly the right place, hugin can often locate the exact position for you. Once you’re happy, click “Add” and move on to the next point. After the first point is in place, hugin will usually suggest where it thinks subsequent ones will be, which makes life far easier. When you’re happy with these two images, click on the right arrow between the two drop-downs of image names to move on to the next photograph in the set and repeat the process until they’re all done. Do create control points to link the last image back to the first one.

Once you’ve selected all your control points, move to the “Optimiser” tab and click “Optimise Now!”. At this point you can see roughly what you’ve got by clicking on the “Fast Preview Panorama” icon. If you find the horizon is very wavy then you can go to the “Move/Drag” tab in the preview and use the “Straighten” icon to try to sort that out. You can also display the control points and see how well they fit to see if perhaps adding more would help.

Next choose the “Exposure” tab, chose the “Low Dynamic Range” preset and click “Optimise Now!” on this page, accepting the default number of points per image. This may take a few seconds to run depending on the number of images. Apply the results.

Finally for hugin, go to the “Stitcher” tab, chose an equirectangular projection and click the “Calculate Field Of View” and “Calculate Optimal Size” buttons, and then “Stitch Now!” and choose a filename for the panorama image. This may take a few minutes to create.

Once the image has been created, load it into gimp. We want the final image to be 2048×1024 (Stellarium apparently requires the image dimensions to be a power of two, in a width:height ratio of 2:1 and as the supplied Mars landscape is 2048×1024 I took my lead from that), so the first thing to do is to scale the current image to be 2048 pixels wide. We’ll deal with the height in a moment. Use the Image->Scale Image menu to set the horizontal size to 2048 pixels and leave the sizes linked so the image is scaled vertically to match.

Now select Image->Canvas Size, break the link between width and height leaving width at 2048 and set the height to 1024. Also click on “Centre” and select “Resize All Layers”, followed by “Resize”. You should now have an image with the horizon centred somewhere around 500 pixels high. If it’s way out then it may be necessary to move it by selecting most of the image, cutting it and pasting it back in appropriately.

Next use the “select area by colour” tool to select an area of the sky, and cut it from the image using “ctrl-X”. Do this until you’ve got rid of as much sky as you want. If you find your sky colour is the same as parts of the image then you may need to tweak their colour a little, or use an alternative method for selecting the areas you want to remove such as selecting areas freehand. The “select by colour” method does make it really simple to remove sky visible through other objects such as trees though.

Finally, you’ll probably find you have a gap where your panorama doesn’t come down to the bottom of the image. I used my grass shots, resized by the same factor as the panorama and pasted them into this image, but you might be able to use the clone tool or paste in a whole sequence of images to fill that area.

Once you’re done, save the image as a PNG. Create a new directory called $HOME/.stellarium/landscapes/my_landscape and copy the PNG file to it. In that directory you also need to create a file called landscape.ini similar to this:

[landscape]
name = My Landscape Name
author = My Name
description = My description
type = spherical
maptex = landscape.png
angle_rotatez = 90

[location]
planet = Earth
latitude = +00d00'00"
longitude = -00d00'00"W
altitude = 125

Choose the altitude that’s correct for you, and obviously set the correct name for your landscape file in the maptex field. Now you should be able to start stellarium up and find your landscape listed with the others. Select it and save your settings. You’ll probably find first time around that your panorama isn’t aligned correctly with the compass. You can change the angle_rotatez setting from 0 to 359 to shift the image around to the right place. The latitude and longitude don’t need to be correct unless you want to use the “use associated planet and position” under the landscape tab when you load the new landscape into Stellarium.
Posted in Astronomy | Leave a comment

Lunar 100 map with blue markers

I discovered a couple of nights ago that with my new red torch it wasn’t actually possible to read the red markers on my Lunar 100 map. So, I’ve made a new version with the markers in dark blue, which I can read with the red torch. It’s not the best solution in the world as I’ve had to mangle the original PDF, but I think it will work for me.

In the event that anyone else would like to use it, here it is.

Posted in Astronomy | Tagged | Leave a comment