Mono lunar imaging with a DSLR

I got to thinking the other day that when I capture lunar images with my 450D they’re pretty much monochrome.  I know there is a tiny amount of colour there, but you really do have to drag it out.  If the colour components arriving at any given photosite on the camera sensor are pretty much the same, I thought, then it might be possible to treat the camera as a large monochrome sensor and not have all the complexity of combining colour values from the Bayer mask.  So, I thought I’d give it a go.  The nice thing is that it’s possible to work from the same set of image data so it should be a good test.

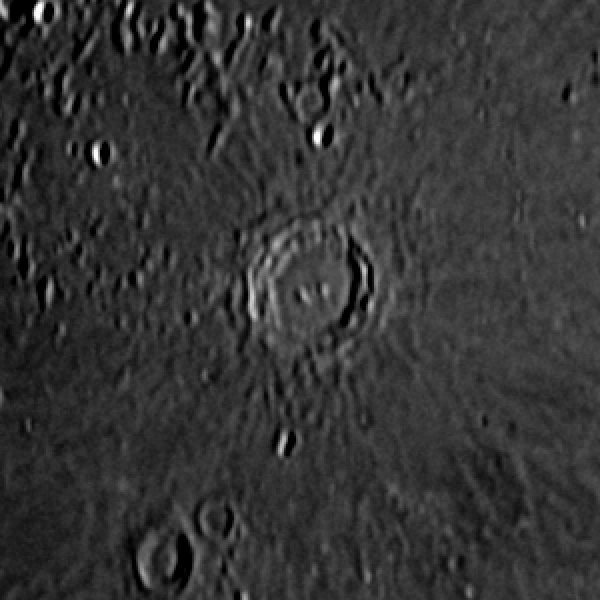
First up, here’s an image of the Moon done the way I’d normally do it, converting the colour image to monochrome before stacking.

moon-2014-01-11-mono-small

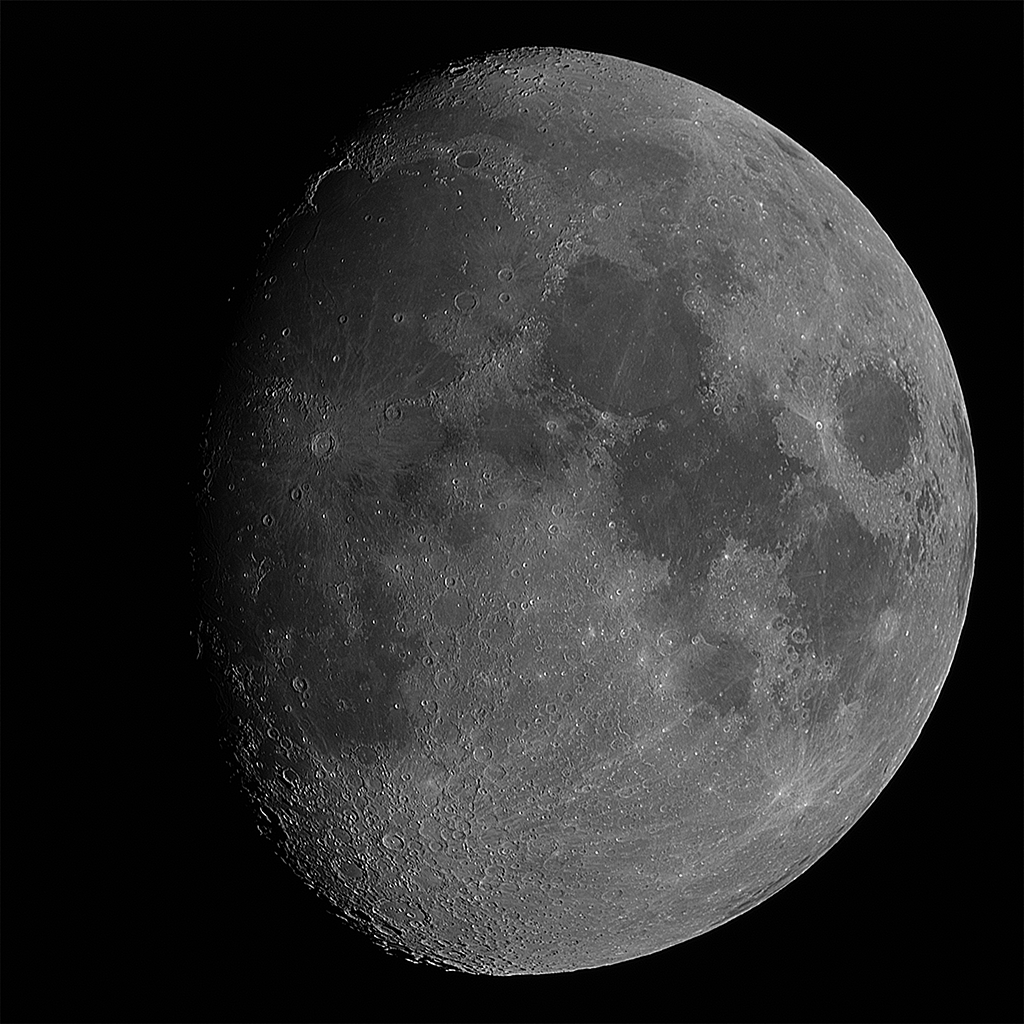
(This image should link to a larger one.)

And now, the same RAW data files, but with the individual pixel levels treated as monochrome colour values and with no combining pixels as happens with the RAW to RGB conversion. And finally stacked as for the previous image.

moon-2014-01-11-dcraw-small

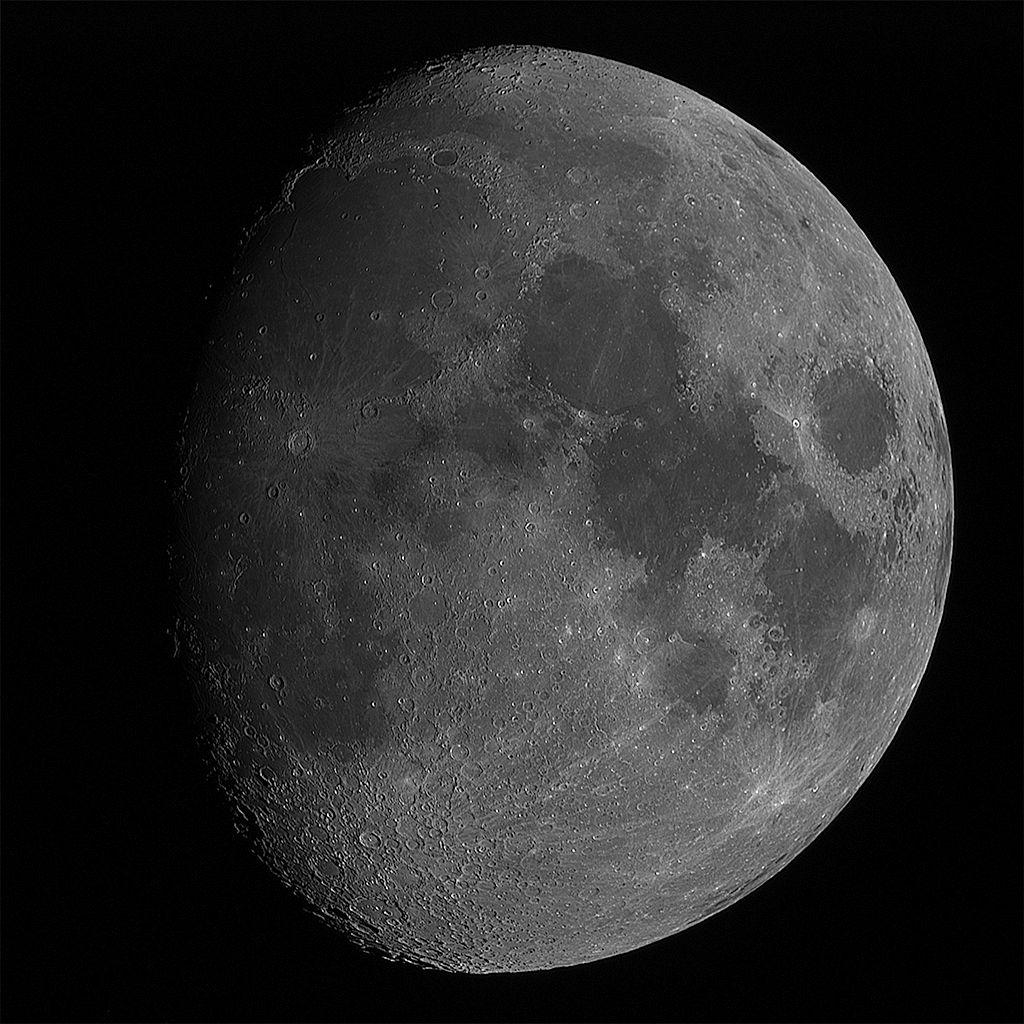
(Again, the image links to a larger version.)

I’m not sure there’s a lot in it, but I think the second probably is the better image.  To my eye I think the contrast is controlled a little better.

I thought it might be useful to compare a small area at a scale where it’s possible to see the individual pixels, so these two are the debayered monochrome image first, and the monochrome “direct from RAW” image second:

debayered

dcraw
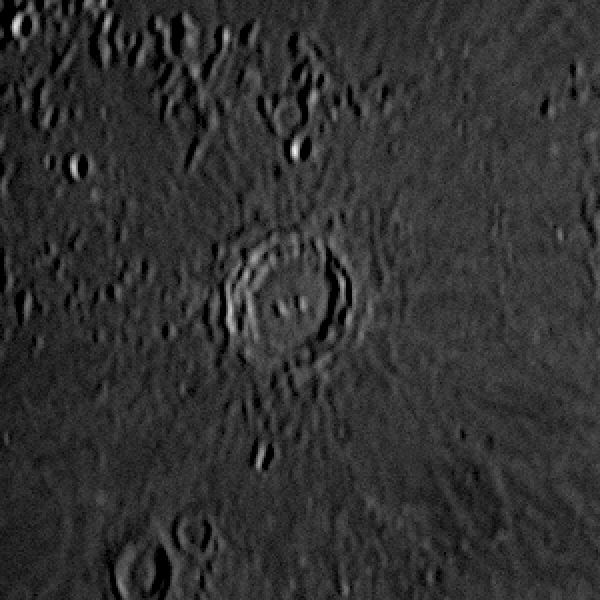
I think these support my view that the contrast is better-controlled in the second version and perhaps the image is even a little sharper, but unfortunately there’s also far more noise apparent too.  I suspect that isn’t visible in the debayered image because the process of combining the pixel values acts to smooth out small variations in neighbouring pixels.  I think more experimentation is required.  Perhaps stacking more images would help get that noise under control.


Posted in Astroimaging, Astronomy | Tagged , | 1 Comment

DIY dew controller

I can’t take credit for this idea.  I had to bite the bullet and sort out some dew control stuff because my C9.25 dews up even if there’s a forecast for a clear sky.  A few people have mentioned making one the same way, but here’s what I’ve done with mine.

It’s not hard to find 12V 8A controllers on ebay intended for use with strings of LEDs.  In fact the labelling looks like 12V .8A, but reading the instructions it definitely says 8A not 0.8A, and I’m really not sure you’d be able to power a very long string of LEDs with 0.8A.  Anyhow, someone suggested that it should be possible to use these to make a dew controller so I thought I’d have a go.  I read a few comments suggesting that they can fail because of overheating, so I decided to strip the parts out of the box they come in and mount them all in a large box that would have room for a cooling fan if I decided I needed one.  They weren’t too hard to remove from the original boxes once I’d worked out how to split the input and output connectors.  I remounted the pots for controlling the power on the lid of the box and fed the output through a panel fuse into a BNC socket for the dew controller cable to plug into.  Power comes from a two-core mains cable that I plug in to my 12V PSU.  The PCBs are fixed to the bottom of the box using double-sided sticky foam pads.

That’s about it, really.  Here’s what it looks like inside:

dewcontroller1and all put together:

dewcontroller2


Overall it works very nicely and the C9.25 stays clear of dew, though it works far better getting the straps on early and maintaining the temperature before the corrector starts to dew up rather than having to clear dew that has already formed.


Posted in Astro Equipment, Astronomy, Projects | Tagged | Leave a comment

Time for a new white light solar filter

I’ve had a white light solar filter made from Baader ND5.0 film (two, in fact) for several years and one of them was starting to look rather tatty so I decided it was time to make another.  Baader’s instructions suggest making the filter holder out of card, but I decided I’d like something a little more robust.  Using a metal frame seemed overkill, but having done some decorating in the house and tidied up all the old paint cans I suddenly found myself looking at one and wondering if it wouldn’t be just the thing.

I started by cutting two rings from the plastic top of a folding picnic table that we’d given up on, just as one would do in card following Baader’s instructions.  Then I took a Stanley knife to one of the plastic paint pots and removed the lower section leaving about 40mm of the side still attached.

wlsolar1I also removed the base, leaving a lip about 10mm wide (to match the inner diameter of the rings, basically) which I glued to one of my rings using some special two-part plastic glue I found online after hunting around various websites to find out what adhesives worked well on plastics.  Unfortunately I can’t find the name of the stuff any more 🙁

I drilled four matching holes in the two rings, painted the whole lot black and lined  the inside part of the paint can with self-adhesive felt.

wlsolar2As per the Baader instructions I used double-sided tape to hold the filter material to one of the rings, but rather than also taping it to the second, I opened up filter material at the holes and bolted the two halves together.

wlsolar3


The filter fits my 127 Mak very snugly and is far more robust than my original cardboard version.

To try to prevent any damage to the filter I saved a large tin from the sweet assortments that are only available (in our house at least) at Christmas.  It fits with a few millimetres to spare on either side and does a fine job.

Since making this visual filter with the ND5.0 film, I’ve also made a photographic filter with the ND3.8 film using exactly the same method.  Such a shame that for much of the first half of this year, the Sun didn’t show up.


Posted in Astro Equipment, Astroimaging, Astronomy, Projects | Tagged , | Leave a comment

Collecting meteorites from rainwater

Allegedly it is possible to collect tiny fragments of meteorites from rainwater.  The story goes that they can drift in the atmosphere until they get caught in the rain and end up falling to the ground.  By trapping the flow of water from a gutter it’s believed that one can find some of these tiny bits of solar system debris.

I’m not personally sure if it’s 100% true and plenty of people will tell you that you’re more likely to end up with dust from industrial chimneys and suchlike, but my son and I thought it would be fun to have a go, so between us we built a little trap into which we could divert the downpipe from one of our gutters to see what happens.  We do at least have the advantage of living in the middle of the countryside with no heavy industry for miles around, so if we can’t do it, not many people can.

We took a 25 litre hypochlorite container and cut a hole in top to feed water in, and one in the side for the water to flow out:

IMG_0038 IMG_0039 IMG_0040A few bits of scrap pipe and fittings that I had lying about allowed us to insert it into the downpipe:

IMG_0041 IMG_0042 IMG_0043We’re only interested in iron-based meteorites as they’re easiest (so the theory goes) to trap, and to do that I bought a decent-size neodymium magnet about 40mm x 20mm x 5mm, sealed it inside a plastic bag and dropped it inside the container.

The water from the downpipe should come into the container through the top, but the pipe continues to the bottom where it is cut off at an angle, meaning it should slosh around near the magnet.  Water leaves the top and disappears down the drain.  If the meteorites are heavy enough hopefully they should stay somewhere near the bottom and the movement of water should eventually bring them near enough to the magnet to trap them.

Soon I think it will be time to take the magnet out and see what we have…


Posted in Astronomy, Environment, Projects | Leave a comment

QHY5 support in oacapture

Support for the QHY cameras is somewhat tricky.  There are all sorts of different versions of firmware floating about, not to mention various different versions of the open source interface library.  Even more awkwardly, whilst many other manufacturers have perhaps only one or two different interfaces across their entire range of astro cameras, QHY seem to have a different interface for each camera.

In the end I decided to write my own library based on pulling together various different versions that I found and that became part of oaCapture release 0.0.3.  I fitted a cheap CCTV lens to the camera and here’s a picture from the first time I had it working.

qhy5Obviously the QHY5 is fairly old hat now, but there are still an awful lot of them in use, so I think it’s worth the effort of supporting.  I’d very much like to add support for some of the other older QHY models, but they don’t seem to come up second hand at prices I can afford too often.

Posted in Astro Equipment, Astroimaging, Astronomy, Computing, Linux | Tagged , | Leave a comment

Time for a catch-up

Quite how half a year has passed since I last wrote anything is beyond me.  Work, life, family and all that jazz seem to have taken over from the little box in the corner of my office.

Time to start catching up, I think…

Posted in Uncategorized | Leave a comment

Amazon goes Subprime

Amazon has just announced that it is bundling it’s streaming media service with the existing “Prime” membership and putting the price up from £49 to £79. I don’t know what the business motivation is for such a change, but it certainly doesn’t suit me.

I’ve heard that their streaming service isn’t that great, but that’s not important to me one way or the other because the bottom line is that it isn’t possible to get an internet connection in this area with sufficient bandwidth to make video streaming viable. At times I can’t even get a reliable embedded youtube video to play, let alone something I’d want in far better quality before I’d consider paying to watch it.

Amazon’s current view on this seems to be “Tough. That’s the service we’re selling” and they’re entitled to their point of view, but it’s not exactly considerate of those existing Prime customers such as myself who see the price going up more than 60% for absolutely no benefit whatsoever. I have the impression that they know this wasn’t going to be a popular move. It’s hardly been trumpeted from the rooftops for months as some compelling new service they’ll be providing. It seems rather more to have been sneaked in at the last moment in the hope that no-one would notice or complain. Oops.

So I guess that leaves me keeping my money and going back to waiting a few days for deliveries from Amazon or, since I no longer have a specific reason to prefer to shop with them, spending the money elsewhere instead. Whatever it was costing Amazon to provide me with the Prime service I wanted, it’ll cost them a whole lot more when I stop buying from them.

Posted in Random | 1 Comment

First Light for Linux imaging application

It’s been a stupendous time coming thanks to the grim weather we’ve had over the last three months, but then if the weather hadn’t been grim I might not have got so far 😀

However, two nights ago I went out on a beautifully clear night and used the latest version of my imaging code to capture some images of Jupiter using the 127 Mak and ASI120MC. This was obviously quite a big deal because although I’ve managed to capture video before, up until now I had no idea how things would work out when actually imaging.

Here are the results. I think I may have oversharpened them slightly in the processing. I’m a little rusty after not doing any planetary imaging for six months. Otherwise however I’m very happy with them. Processing was with PIPP, AS!2 and Registax v6.

montage

And just for fun here’s an animation of ten frames

jupiter-anim

Posted in Astronomy, Computing, Linux | Tagged , , , | 1 Comment

Linux support for Imaging Source USB CCD astronomy cameras

I’ve been on something of a mystery tour over the last few days trying to work out exactly what is required to get the Imaging Source USB CCD astronomy cameras working on Linux. What information I’ve been able to find has been incomplete or even totally wrong.

The cameras I’m talking about here are these:

  • DFK 21AU04.AS
  • DMK 21AU04.AS
  • DFK 21AU618.AS
  • DMK 21AU618.AS
  • DFK 31AU03.AS
  • DMK 31AU03.AS
  • DFK 41AU02.AS
  • DMK 41AU02.AS

Whilst I’ve not found one to test, I assume the “DBK” variants of the colour cameras will be the same. There may even be others. Reading some German web pages that turned up in Google after I’d found the solution and searched for it again suggests that there are some TIS cameras intended for use with microscopes that may be the same too.

There is the hint of a suggestion on some web pages that all of these cameras are actually UVC or very close to it, but plug them in and they aren’t recognised and the UVC driver does not load. Inspection of the code makes it fairly obvious that this is because the UVC driver supports Imaging Source cameras with USB Vendor ID and Product ID of 199e:8102, whilst all of the above cameras have 199e:8101.

Apparently in the past it has been necessary to downgrade the firmware on these cameras to get them to function on Linux. I don’t know how that worked, but despite the insistence of TIS in their support forums it is no longer necessary. Neither is it necessary to use the unicap library (though I assume it would work if you did).

For my 3.8.0 kernel (and I am led to believe for all v3 kernels), all that is required to get the camera to function with V4L2 after plugging it in is to do this (as root):


modprobe uvcvideo
echo "199e 8101" > /sys/bus/usb/drivers/uvcvideo/new_id

The UVC driver should then recognise the camera. The colour cameras will not produce debayered image frames so there’s still work to do there unless you use an application that can handle the debayering itself, but it is at least possible to get data out of the camera now.

It’s possible to configure udev to do run a script that will execute the two lines above when the camera is inserted. I have a script called /usr/local/bin/config-tis-camera.sh that looks like this:


#!/bin/bash
#
# Load and appropriately configure UVC video driver for the USB TIS CCD
# cameras

USB_ID="199e 8101"
/sbin/modprobe uvcvideo && echo $USB_ID > /sys/bus/usb/drivers/uvcvideo/new_id

and a udev rules file /etc/udev/rules.d/70-tis-cameras.rules


# Udev rules for TIS CCD cameras
#

ACTION!="add", GOTO="tis_end"
SUBSYSTEM=="usb", ENV{DEVTYPE}=="usb_device", GOTO="tis_test"
SUBSYSTEM!="usb_device", GOTO="tis_end"

LABEL="tis_test"

ATTRS{idVendor}=="199e", ATTRS{idProduct}=="8101", RUN+="/usr/local/bin/config-tis-camera.sh"

LABEL="tis_end"

which works for me on Mint 15.

Posted in Astro Equipment, Astroimaging, Astronomy, Computing, Linux | Tagged | 3 Comments

Dehydrated to the core

It’s been a busy weekend fruit-wise. Yesterday the children and I collected some of our ripe dessert apples and cored, peeled and sliced them. It took about forty apples to fill our dehydrator which I left on overnight. The result is firm but not hard dehydrated apple rings with an intense flavour. I had intended that they might be used for snacks and packed lunches when the children are at school, but if they don’t finish them first, I might well…

IMG_0022

Posted in Smallholding | Tagged | Leave a comment