I have about 90kg of oilseed rape honey that has solidified and obviously before I can turn it into soft-set honey I need to melt it again. Warming cabinets are far from cheap to buy and it’s not exactly hard to build one, so I decided to do just that. It doesn’t even need very many parts. I started with:
- A broken 600mm square chest freezer (that I’ve actually used for storing chicken feed in for a few years, though my original intention was to make it into a smoker)
- A 120mm diameter fan from from a PC power supply that I’d scavenged from a dead PC
- A 60W Danfoss tubular greenhouse heater, about £12 from ebay
- A hot water cylinder thermostat. Not all have a wide enough range, but I found a Siemens model that went down to less than 30C which is sufficient. £11 from Screwfix, I believe
- An aluminium CPU heatsink, also scavenged from a dead PC
- A 6V wall-wart power supply (originally came from a Sony Discman)
- A surface-mounted 13A mains socket
- A length of 3-core electrical cable
- Some scraps of wood
Everything except the thermostat and heater were lying around in the workshop, and I even found another suitable thermostat later on. I know some people use 60 watt light bulbs as a heat source, but we have a lot of trouble with bulbs blowing here, and as light bulbs aren’t really designed to be on for long periods of time in confined spaces it would probably just exacerbate the issue. Incandescent bulbs are becoming harder to get hold of, too.
The heater needed to be mounted horizontally (so the instructions said), so I first fiddled about to see how I could arrange things to fit most containers into the freezer compartment. With the heater across the centre of the compartment floor there was easily room for four 15lb honey buckets, but 30lb buckets would be marginal. With the heater across the back, two 30lb buckets should fit easily, but there’s only room for three 15lb buckets. If I build a platform across about a third of the compartment over the top of the heater however, I’d still get two 30lb buckets or five 15lb buckets in, so I eventually settled on the second arrangement.
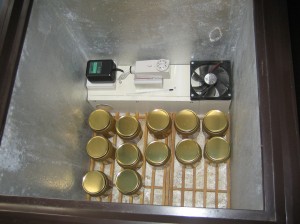
I don’t have photos of the construction process, but hopefully the picture at the end should demonstrate what I did clearly enough.
I wanted some protection for the heater so it wouldn’t easily get honey spilt on it (I may also use the cabinet for warming comb), so the first job was to make a cover out of wood (which in fact the heater also mounts onto). I made two holes in the cover, one at each end. Over one hole I fixed the fan so it is drawing air over the heater and blowing it around the cabinet.
I then took the heater power cord and connected it to the thermostat, with another length of cable going from the thermostat to the back of the 13A socket. I ran a longer cable through a small hole in the freezer wall to power the socket and put a plug on the other end. Now the socket is live when it’s plugged in at the wall, but the heater is controlled by the thermostat.
I used wire to fix the thermostat to the flat side of the heatsink and fixed the heatsink to the heater cover just by screwing through the wood until the screws bit into the vanes of the heat sink.
Power to the fan comes from the wall-wart plugged into the 13A socket. It’s a 12V fan running at 6V, so it’s turning more slowly than intended, but that’s no big deal for this.
The final touch was to put a rack on the freezer compartment floor to allow air to circulate beneath the honey containers.
Here’s a photo of the insides, with a few honey jars with crystallised honey for testing. I also put a thermometer inside to see how well the temperature matched the thermostat. It’s not that accurate, to be honest. I think the thermostat reads about 5C high.
If it works well then it’s a design I might well use again on a larger scale. A 1200mm wide chest freezer would quite possibly hold 300lbs of honey, which is more than enough in one hit for the time being.

