It seems to be fairly widely accepted that the 127 Mak suffers badly from vibration when the focuser is adjusted by hand on the mounts it’s shipped with as standard. That’s certainly the case with mine. For me, it would also be useful to be able to adjust the focus when sitting at my laptop when imaging. I’ve read a number of descriptions of the motor drive focuser conversions that people have done to help alleviate this problem, but they all seem to be for alt-az mounted OTAs and have a convenient mounting point for the motor on the back end of the dovetail allowing it to sit right next to the focuser.
My Mak usually goes on my EQ3-2 mount and as such has the dovetail on the bottom of the OTA rather than the right hand side, leaving me no convenient existing mounting point for the motor. I didn’t want to drill the OTA either. I considered various options before combining a few other peoples’ solutions with some bits of my own. Here’s what I did:
I started off with a Skywatcher motor focuser drive that I’d originally bought for my ST102. I’d already donated the coupling from this to my EQ3-2 direct DEC drive conversion, but that was fine as I wasn’t planning to use it. I considered driving the existing focuser knob with a 4mm O-ring and pulley, but wanted better control and so eventually opted to use a timing belt and gears that a few other people have also tried. The gears and belt came from motionco. A 60 tooth gear was probably the largest I could fit on the focuser end and a 15 tooth gear was the minimum for the motor end and even then there’s only just enough metal to bore it out to 6mm to fit the motor drive shaft. Others have used the same ratios, so I followed the herd.
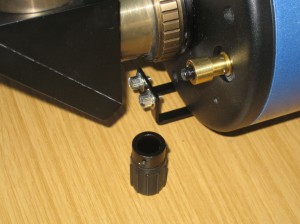
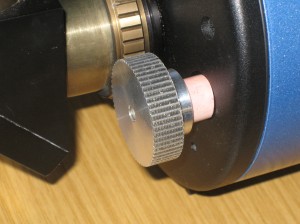
One of the timing belt conversions I’ve seen looks like it involves removing the rubber cover on the focus knob and fitting the gear over the top of the remaining plastic section. That requires drilling the centre of that gear out to 15mm. I don’t have a 15mm drill (a pathetic excuse, really 🙂 and couldn’t get the rubber cover off the knob, so I decided to remove the knob entirely and fit the gear to the shaft directly. There are a couple of “gotchas” with this approach. Firstly, the focus knob is all that stops the mirror falling down the OTA if it’s stood on the corrector lens end. The second is that the mirror is moved on a threaded rod that moves up and down inside the focusing shaft (similar to how a tap opens and closes, I guess) and that rod eventually ends up protruding from the shaft when the mirror is at the end of the OTA, as seen here:
To address the first problem I had to make up a spacer to fit between the gear and the back of the OTA to take up the play between the two. I happened to have some rocket launcher tube left over from last Guy Fawkes Night that fitted the bill perfectly once cut to length. I was pleased to have found it because my other option was a section of 15mm copper tube and I didn’t really want that spinning against the back of the OTA no matter how smooth I could make the edges.
For the second, whilst I needed to bore out the centre of the gear to 12mm to fit over the shaft anyhow, I had to go much deeper than the length of the shaft to allow space for the inner rod inside.
As several other people have done, I opted to use the smaller mount for the Skywatcher motor fixed to the dovetail (visible in the above photo), but the positioning meant I’d have to make a bracket to fit on that and carry the motor. My best guess when I ordered the gears was that I’d need a 110 tooth belt to have clearance at a convenient mounting point.
First job once the gears arrived was to enlarge the bore of the 15 tooth wheel to 6mm using a pillar drill. This gear is actually in two parts — the collar holding the grub screw has the gear section passing through the middle of it and boring out to 6mm takes almost all of that metal away. I cut just deep enough to pass the grub screw hole, but in retrospect I think I might be tempted to use a slightly larger gear. Fortunately it all fitted very nicely.
I then enlarged the bore of the 60 tooth gear to 12mm, but stopped just short of going all the way through which means that although there’s still a hole on the outside face it’s only small and I won’t risk getting grease from the innards all over my hands if I’m operating the focuser manually. Here’s the finished gear installed, with the spacer in place:
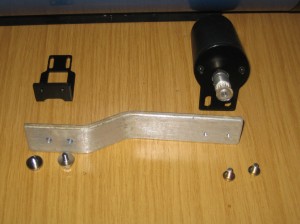
Finally I cut and bent a piece of aluminium to make a bracket for the motor and to fit onto the Skywatcher bracket. At the Skywatcher end I drilled two holes to match the M4 threaded ones in their bracket and at the motor end I drilled and tapped another pair of 4mm holes in a position that allowed a little adjustment of the motor to take up the slack in the belt:
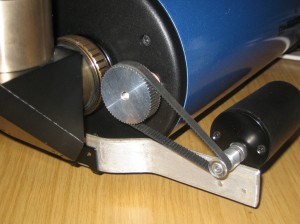
And here’s the whole lot assembled:
All it needs now is a bit of paint.
Initial tests on the bench suggest that it works nicely, so now I’m waiting for some clear skies for a final test.
Having assembled it all I think I could easily have got away with a 100 tooth belt and may well swap to one, but I’m not going to order a new one now when the postage will cost more than the belt, so it can wait until I need other bits.
The one thing I haven’t yet done is fix the Skywatcher bracket to the dovetail. I’m still pondering on the best way to do that. I can tap the dovetail to accept a couple of screws to hold it in place, but I think if the heads protrude at all they’ll scratch the OTA. I might need to countersink them into the face of the bracket to avoid that.


I’ve just bought a 127 and despite following the (appalling) instructions for set up, cannot focus it onto anything! Do you have any tips? Been a photographer for many years and this is my first forey into a scope I can attach my sale onto. Help!
Setting it up during the day and trying to focus on something distant may help. There’s a huge amount of travel on the focuser knob. I think it’s about 23 full turns end-to-end. Just wind it all the way one way and then work your way back whilst checking for focus. The focus point will (probably) change slightly with different eyepieces. The scope probably won’t focus on anything closer than, say, fifteen metres away.
It’s also possible you’re having problems because the field of view of the Mak is so small and you can’t see anything you recognise, so the Moon is a good first target at night. Use the longest focal length eyepiece to start with (usually 25mm or 20mm I think).
I’d also recommend joining Stargazer’s Lounge where you’ll find lots of people willing to help.